
JinSe Commerce, an import and export company for diesel engine parts and peripherals for ships.

IMPORT PRODUCTS

DIESEL FUEL FILTER

DIESEL FUEL FILTER

Home > IMPORT PRODUCTS > DIESEL FUEL FILTER
  • New Fuel Filter-Separator Has BACK-FLUSH Feature

  • Close-Up Of The Sapar 2000

  • Fuel Flow

  • Regeneration Feature

  • Back - flushing

  • Back - flushing PROCEDURES

  • Replacing The Filter Element

New Fuel Flutter-Separator Has BACK-FLUSH

Diesel fuel filtration specialist. Williboard Losing Filter-Technick GmbH,
recently introduced a new generation of combined filter-water separators
under its well established Separ brand name.

Although considerably more compact than its predecessors, the new
Separ 2000 diesel fuel filter-separator range is designed to offer significant
improvements in filtration and separation. Along with a long extention in the
service life of the filter element due to an innovative design back-flushing
feature.

The Separ 2000 units are available in five sizes to suit fuel supply systems
with nominal delivery rates of 5, 10, 18, 40 and 130 liter/min. These
correspond to an engine power bracket of 5 kW to 10,000 kW, reported Losing.
Applications include on-and off-hidhway vehicles. stationary equipment. and
diesels for marine propulsion and on-board power generation applications.

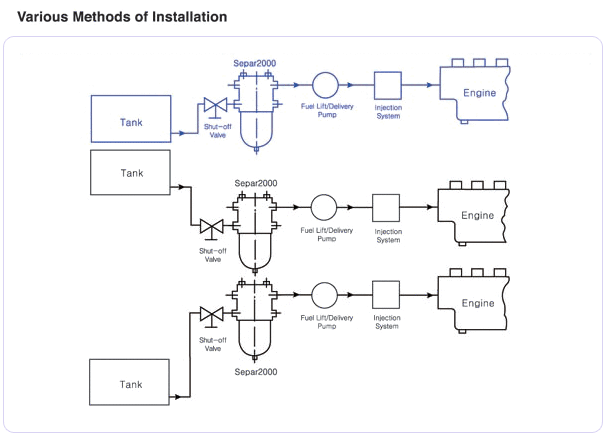
INSTALLATION OF "SEPAR 2000"
+ The Separ 2000 must be installed on the suction side of the fuel system

+ The Separ 2000 should be installed in a easily accessible place in the fuel system(suction side)
All other filters on the suction side should be removed

+ The filter can be installed either higher or lower than the tank
For best results, arrange for the filter inlet to be level with the top of the rank

+ In cases where the filter is at a lower level, a shut-off valve must be installed; otherwise fuel
will flow out when the filter lid is opened. After installing the Separ 2000, fill up the filter
with fuel to avoid running the delivery pump without fuel

+ Finally, test the filter and joints for leaks
CLOSE-UP OF THE SEPAR 2000
+ Small physical size in comparision to flow rate

+ High performance

+ Low restriction

+ Long-life filter element

+ Improved operating economics, Simple Operation

+ Easy installation

+ 5 stage filtration

+ Enviromental friendly
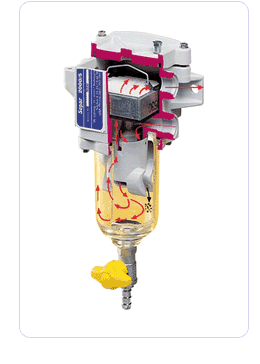
FUEL FLOW
Fuel is sucked into the filter by the action of the lift pump via either port A or B

+ STAGE 1

Fuel enters through port A to B where it will then enter the centrifuge, separating larger particles of dirt and droplets of water down to 30 microns. The centrifuge does not spin. The filter spins the fuel in a circular motion as it passes through the channels of the centrifuge.


+ STAGE 2

As the fuel comes out of the centrifuge it will then hit the side of the bowl allowing the dirt and water to settle to the bottom of the bowl.

+ STAGE 3

The fuel flows through the second centrifuge stage and passes on the outside of the centrifuge. At this point the smalldroplets of water and dirt particles are thrown to the center of the bowl, moving around and forming larger droplets ofwater. There the larger vane will catch the particles and bring them down through the vane. This is produced by the vacuum on the lowest part of the second vane.

+ STAGE 4

With the continuous circular motion of the fuel, the dirt and water droplets continue to grow together; becoming heavier
and falling back into the bowl again.

+ STAGE 5

Specially theated water resistant paper will filter out all remaining dirt and water. Fuel then leaves the filter through port C or D.
REGENERATION FEATURE
"The separator bowl is inspected visually for accumulation of dirt and water with the engine turned off. Water and dirt are drained into the separator bowl by opening the bleed valve at the top of the filter. Then, the drain cock is opened to drain the dirt and contaminants out of the bowl. By draining the bowl, clean fuel above the filter element flushes through the element and washes it. After reclosing the bleed valve and and drain cock, the filter is ready to be used again. We can repeat back-flushing 10 to 15 times before the accumulation of very fine particles finally closes the pores in the filtering medium. The effective life of the filter element life is corresponding extended. An incidental benefit is that as the filter pores become filled with fine particles, its filtering effect also increases."
BACK - FLUSHING
+ Backflushing is required when dirt and water block the filter element. The following signs will indicate this:

+ Loss of engine power

+ Back smoke may exhaust from the engine

+ Vacuum gauge will indicate a high restriction reading on the element of the filter
BACK - FLUSHING PROCEDURES
1. Stop the engine or switch over to the spare filter on the switchable units

2. Open the bleed screw
- This introduces atmospheric pressure into the filter
- The dirt particles and larger droplets of water will release from the bottom of the filter element
- Gravity will assist the dirt particles as they slowly fall to the bottom of the bowl

3. Open the drain valve (push in and turn)
- The clean fuel above the filter will backflush through the filter element. This will release the
smaller dirt and water particles
-Drain the fuel until the dirt and water are removed from the filter and the bowl

4. Close the drain valve

5. Close the bleed screw (DO NOT OVER TIGHTEN)

6. You may now start your engine or switch back to the clean filter

7. If the engine still lacks power, try backflushing the filter again

8. If restriction is still too high, change the filter element
REPLACING THE FILTER ELEMENT
Note: Before changing filter, backflush the filter elemen

1. Turn off the engine

2. Loosen the lid screw

3. Remove the lid

4. Take out the spring frame

5. Take out the filter element

6. Replace the element

7. Put the spring frame on top of the element

8. Check the lid gasket(if necessary, replace). Then correctly seat the gasket and lid

9. Screw the lid tightly on

10. Check for correct positioning of the lid

11. Start the engine again